top of page
Search
  • Writer's pictureAnthi Metaxa

The last subject that I need to experiment with before attempting to animate properly, is to play around with framerate. The framerates that I will be using are:

  • 12 fps

  • 24 fps

For this experiment I want to see what are the advantages and disadvantages of each framerate and how they could be used effectively throughout the armature's movements.

So, the first framerate that I wanted to experiment with was 12fps.


12 FRAMES PER SECOND EXPERIMENT:

The first thing I had noticed when working in 12fps was that it was less smooth such as 24fps, since there were less frames to experiment with.

However, even saying this, the idea of using 12fps felt a lot easier for me. With this framerate it was a lot easier to experiment with the dragging of frames and just in general experimenting with the frames themselves due to the low framerate. I was extremely proud of capturing really slow movement with the hands throughout the animation, so this framerate was extremely useful to be able to show my intentions.

In addition to this, 12fps is commonly used when trying to create a more stylized piece since I will be working on two's instead of working on one's.

Lastly, the idea of using this frame rate allowed me to create more of a Stop Motion feel to my work, since the framerate is a lot lower instead of working in 24fps which is commonly used for animation in films.

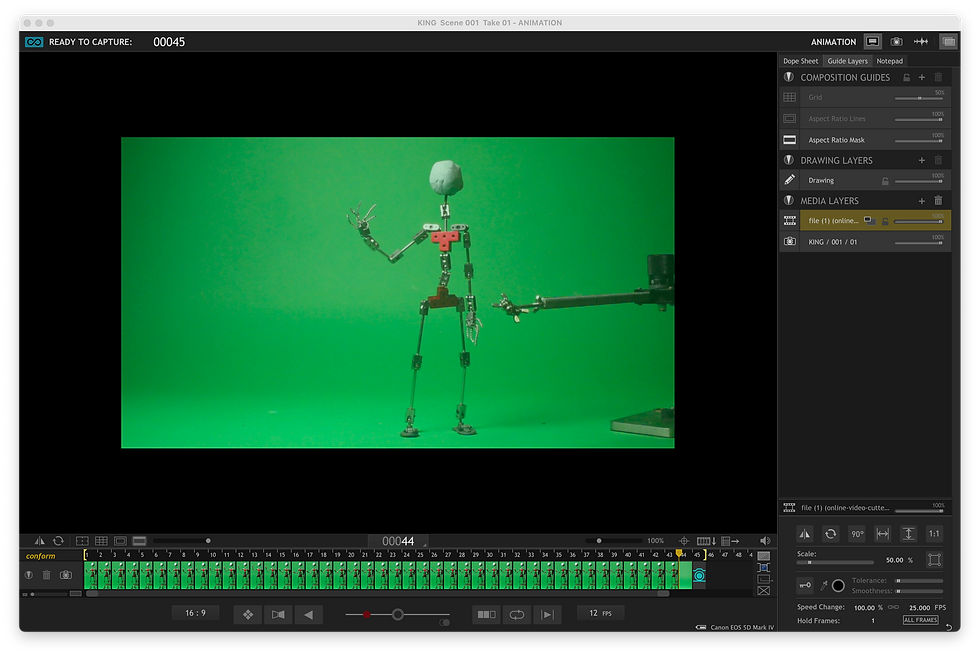
Here is a screenshot of my work in Dragon frame. It shows at the bottom, the framerate that I would be working in, which in this case is 12fps. It also shows the me using the onion skinning tool, hence why the armature looks faded and not matte in the program.


IMPROVEMENTS?

I noticed that as mentioned in previous posts of mine, that the compositing stage would be extremely difficult since the rig blends in with the armature, so it would be hard to differentiate the two.

Another thing I could improve on, was the framing of the camera. It looks like the feet and head are close to being out of frame so perhaps adding more space would be a lot better.

All and all, there are still things to improve on, such as adding movement to the hips and waist, however, this experiment was definitely and improvement.


24 FRAMES PER SECOND EXPERIMENT:

Even though 24fps feels a bit a lot smoother due to the more framed needed in the animation, I felt as though it felt too fast at times, especially for this movement that I was trying to portray. So, if I did end up using 24fps it would be important to try holding on specific frames to help with timing.

One major disadvantage that I noticed about this framerate was that, if one frame is not suited for the movement, it will look extremely jittery and out of place, which in this example the right hand is really wobbly and shaky.

Another thing to note, is that working in 24fps compared to 12 is a lot more time consuming, so if the outcome isn't the best then the movement will look off.


Here is a screenshot of my workspace in dragon frame while experimenting with 24fps. It was extremely useful to have my reference on the side while filming, since I can toggle between the frames and see the slight movements of the movement through the reference.


CONCLUSION


I believe I will be able to alter the framerate depending on the speed of the movement that I would like to capture for my show reel.

So, if I want to capture really slow movements, then 12fps is the better frame rate for me to go for and if I want a really fast movement then I will end up picking 24fps.

All in all, this entire process for my project was a whole learning process through repetition.

But isn't that what animation is for?


2 views0 comments

Updated: Mar 23, 2023

So for what I had to do for this week was to experiment with rigs and magnets. So, at first, I wanted to experiment with what I was most familiar with using; rigs.


So for this experiment, I decided to focus on three emotions:

  • Evil

  • Scared

  • Annoyed


EVIL EMOTION EXPERIMENT


The first emotion that I will be discussing about for this experiment is evil. For this experiment, I chose to mainly use rigs. So, when filming I decided to not use magnets to see if there was a difference in quality for my work.


So this was the first experiment that I got to to do. I realized that the black backdrop does not suit the armature, since it is just the proper skeleton of the armature instead of the original armature I was going to use.

So, for the backdrop I decide that using a green screen would be better since I will be able to edit the colour of the background during the Adobe post-production in Adobe after effects or premiere pro.


So what do I like about it?

  • I really liked experimenting with the shakiness of the hand in the animation. During it I was trying to play with holding frames as well as one to one frames. I noticed that a mix of both helps a lot with the fluidity of the animation

  • The lighting is really good and the animation is taken in really good quality, I really tried to focus on the quality of the camera. The lighting helps capture the intensity of the shot that I am trying to make.


Issues with the animation?

  • The shakiness of the hand is too much, so I will have to play around with the frames a lot more and try to reduce the attention on the hand shaking

  • I noticed the armature sometimes slides, as the movement is happening, so I decided that having magnets on the ground will help a lot in keeping the armature still and sturdy.


Here is a time-lapse of me animating this piece with the reference on the side, showing my workspace of Dragon Frame. I started to use my footage more as a reference since rotoscoping (as mentioned in my previous experiment) was not effective. Again, the armature figure as well as my figure in the footage is a lot different, so it was extremely difficult to try to experiment with the pose.


SCARED EMOTION EXPERIMENT


The second emotion that I decided to experiment with is 'fear.' For this experiment, I decided to fully use magnets. I noticed that I was unable to fully complete this experiment since the armature was not balancing properly with the magnets. The green back drop suited the armature a lot better since the head and limbs were standing out a lot more. As well as, I will be able to edit this during post-production.


Here is the final product of the magnet experiment. It wasn't much but it was incredibly difficult to deal with since the armature kept swaying everywhere and would constantly keep falling down. It was pretty hard to deal with considering I was trying to put magnets under both feet but it was still struggling to stand upright once one magnet was moved.


Here is the time-lapse of animation. In the time-lapse I realised I was too focused in trying to keep the armature in the same position with the movement rather than animating the armature itself. So, trying to animate with magnets only was extremely time consuming and I don't think I would use only magnets. I think I would use magnets with the rig as a way to hold the armature down.


Advantages of Experiment with Magnets

  • I would not need to composite out a rig during the video editing stage if I used magnets.


Disadvantages of Magnets

  • Would've been ideal if this animation was finished but it was way too time consuming and I was unable to film 1 second of it.

  • The backdrop would move around during filming which is an issue since it makes it harder to edit in post-production.

  • Spent too much time trying to get the armature back into position rather than animating.


ANNOYED EMOTION EXPERIMENT


The last emotion that I decided to experiment with is 'annoy'. For this experiment, I chose to use both rigs and magnets.


Here is the final animation I got to create and I noticed after exporting that the legs were cut out. I realized that the borders were not on showing the aspect ratio of the animation in my workspace on Dragon Frame after filming. So, I was really bothered by it.


Here is my workspace in dragon frame. I decided to take a screen recording of the animation on what it could've looked like if the feet were not cut out in the final product. You can see how I forgot to edit the opacity of the borders to show the aspect ratio of the final product.


What I like about it?

  • Out of all the experiments, I think this is the smoothest and most effective one. I feel as though I was playing around with framing a lot to try to capture what I wanted to capture.

  • I feel as though I was able to play with framing a lot more and tried to add a lot of weight, especially as the leg goes to hit the ground.

  • I also chose to put magnets under one of the legs since I was aware that one of the legs doesn't move that often. I also did this so the other leg would have the ability to do the movement that it needed to do.

Improvements?

  • I think I can try to put more emphasis on weight for the final version of the animation, especially as the leg hits the ground or as the upper body bounces in the beginning.


Conclusion


I think this experiment was extremely effective, since I got to see what worked and what didn't work for me. I found out that I preferred to use the rigs more rather than using magnets, since the armature is helped by the rig to stand upright.

As mentioned previously, the magnet experiment was extremely frustrating since I focused more of my time in trying to get the armature to stand up rather than focus on the animation itself, hence it falling constantly and moving sideways a lot. The only reason why I would use magnets would be to hold the armature down in place as the rigs allows the armature to stand.

0 views0 comments

Updated: Mar 30, 2023

The first experiment that I wanted to play around with was 'Rotoscoping'. The original idea was for me to be able to rotoscope all of the movements that I had created references for. However, I realised that would take too much time and that I have limited time for this project. So I decided to set my goal to 1-2 movements for rotoscoping.

The reason for this was so I could have an idea of the benefits and the drawbacks that I noticed in this experiment.


ROTOSCOPING - ARMATURE ATTEMPT 1

For the first attempt, I decided to book the 'Bipid Armature' from the University. There were two to pick from, however, I chose this armature specifically since I liked the idea of the armature having limbs. The only issue that I seemed to notice was the lack of head. A solution to this, I decided to create a head by using plasticine.


Armature Bipid that I booked from the University

Once I started to attach the armature to the rig, I noticed that it wasn't the sturdiest of armatures. The part of the armature that attaches itself onto the rig was wobbly, so it kept on tipping over after several movements.

Due to this, I suffered a lot in terms of progress, since I wanted to finish the idea of rotoscoping in this week. I still feel as though I will be able to finish it this week, but not to the extent that I could've.


A screenshot of my workspace in Dragon Frame using my footage as reference.

Here, is my workspace in Dragon Frame, using my footage as a reference layer. I was able to change the size of the footage to suit the anatomy of the armature. I also noticed that the armatures don't really look similar to humans anatomically. So that was one thing that I noticed within the experiment.


Here was the 1 second animation I was able to produce with the armature. Due to it being extremely difficult to work with, it was extremely wobbly a jittery. Because of the armature being wobbly, I was unable to film more than 1 second (24fps) since it was unable to be sturdy from the waist. I tried to spend a few days to try to improve the condition of the armature, however, I was unable to do so.

So, I had to find a solution as soon as possible.

The only solution I could think of is book the other armature type from the university or try to book another armature of the same type. I had booked the armature of the same type, however, there were still issues with that armature so I decide to go for the other type.


ROTOSCOPING - ARMATURE ATTEMPT 2

The Metal Armature Kit that I booked from the University.

For the second attempt on the rotoscoping experiment, I decided to use the 'Metal Armature Kit'. The first thing I noticed after booking it, was to check the bolt on the waist of the armature. Thankfully, it seemed extremely sturdy so that was an upgrade from the previous. The drawback to this armature was that it was lacking the limbs that the previous had, making it feel less human. For now, I will keep it as it is for my experiment, however, once I finish with my experimentation of rotoscoping, frame rates and magnets and rigs I will decide to add some layers on the limbs so it seems more human-like. To add some character to it, even after adding a head.


ATTEMPT 1:

Here was a little experiment that I did with this armature for the rotoscoping experiment. I wanted to try something simple first before going on more complicated movement.


TIMELAPSE - ATTEMPT 1

Here is a screen recording of the first attempt that I had done. I noticed while doing this, that it was extremely confusing for me to focus on the reference footage as a separate layer on top of the armature layer in dragon frame. Because of this, I decided for my second attempt to try using rotoscoping but having the footage as a pop up video.


What are things that I like about it?

I liked the movement of the right leg moving forward as well as the movement of the right arm swaying upwards and back down.


What I don't like about it?

I felt as though I should've tried to add more weight on the left arm, since I wanted to create the idea of the staff hitting the ground. So, next time I should experiment more on weight and emphasize the idea of the arm holding the staff.


ATTEMPT 2:


This was the second attempt that I had done for my rotoscoping experiment and I believe there was a lot of things better with the second attempt.


What are the things I like about it?

I really liked the movement of the leg moving forward in this version since it was a lot smoother.

Not only this but I preferred the right arm movement as well due to the same reasoning.

Another thing that I noticed was that I started to focus more on the armature's silhouette throughout the movement instead of copying frame by frame through the rotoscoping technique.

Lastly, I really liked how the left arm had more force when it came to the movement of mimicking a staff hitting the ground. To make this more effect for my final version, would be to use a prop similar to a stick to make it feel more authentic and realistic.


What could be improved?

I believe the upper body could have a bit more movement to it and be more expressive throughout the movement.

Another thing to note is that for the final iterations, I would need to create an extra layer on the armature to mimic muscles on the body parts.


CONCLUSION?


What I have noticed while doing this experiment was that I ended up preferring using my video footage as a reference rather than trying to copy it frame by frame. Since I tried to copy it frame -by -frame in my first attempt, it felt lifeless, stiff and as a general rule felt extremely time consuming since it was filmed on ones.

Additionally, I was also unable to keep the reference footage as a lower opacity layer when trying to animate since it was extremely confusing for me to keep track on the armature as well as the footage, which effected my experiment.

Using my reference as a pop up video in Dragon Frame helped a lot since I was able to see the body more clearly and was able to experiment more with the silhouette of the body. I even tried changing the posing a bit since I didn't like how the reference footage had certain poses.

I noticed for the rotoscoping experiment, that it would be extremely useful to rotoscope the main key frames and then just work based on the reference.

It was really interesting for me to see that I will constantly keep changing things and that not everything is going to be finalized the way that I wanted them to be.


bottom of page